

Compile For Cydia Submission
Author: BigBossUpdated September 23, 2011:
In order to submit your app to Cydia, you will need to do a few things:
Sign your app with ldid, build for iPhone OS, test your app in jailbreak world.
Dont have a MAC?
Before you read on, there is a very easy framework for building applications in iPhone OS without xCode created by genius Dustin Howett. With this framework, you can compile on your iPhone, iPod, iPad without the need for owning a MAC.
See this link for more details. If you want quick and easy install instructions for installing theos on your idevice to use via ssh, do this:
1) Fire up cydia, make sure you’re set as user type developer, and search “BigBoss Recommended”. This is a set of command line tools that also has a hidden installs script.
2) In ssh on idevice, type “installtheos3″. This will download over 100mb of data so make sure you have a stable Wi-Fi connection.
3) This will install theos to /var/theos.
4) For further theos help, I recommend irc channel irc.saurik.com #theos or refer to the link above for more details.
If you want to compile for Cydia using xCode, read on.
Compiling on the MAC with xCode
Code signing from xcode will not work. You will need to sign your app with ldid. Here are the steps to test your app in jailbreak world, sign it, and make its icon show up on your iPhone:
1) Build your binary in xcode with iPhone OS 3.0 setting or build your app using iPhone GCC or toolchain. Xcode always defaults to building only for the latest firmware. This seems like Apple’s way to force everyone to always update. It’s silly. Unless you have a technical reason for it, build for iPhone OS 3.0 not 3.1, 3.1.3 etc. If your app requires a specific version of the OS, you must state this clearly in the submission form or your submission will be delayed while I ask you to rebuild your app.
For code signing, you can just use “don’t code sign” in the “info” section of your project. Search for “code signing” to find where to set this. You will use ldid in a step further down instead. Note: this option seems to only exist for the 2.0 SDK or 2.0 SDK build option.
For SDK 3.0, disabling code sign is a bit trickier. It requires editing your /Developer/Platforms/iPhoneOS.platform/Developer/SDKs/iPhoneOS3.0.sdk/SDKSettings.plist and making it look like this:
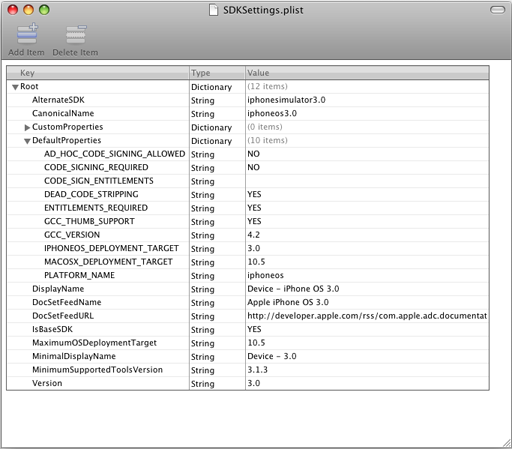
Pay special notice to CODE_SIGNING_REQURIED, CODE_SIGN_ENTITLEMENTS, and AD_HOC_CODE_SIGNING_ALLOWED. You must restart xcode to have changes take effect.
2) SSH your application bundle to /Applications folder on iPhone.
3) chmod 755 your app binary inside your app bundle. If your app name is Test.app and your binary is test, then you would use: chmod 755 /Applications/Test.app/test
4) ldid sign your binary. Using the test example: ldid -S /Applications/Test.app/test. You should run this as user root, not user mobile. If you don’t have ldid installed on your iPhone, ssh in as user root, apt-get install ldid, then you will have it. Note: if you are working in mobile terminal, make sure to su root first. Note #2: ldid requires a unique inode. If you are replacing your binary with another compiled version, you must delete the old one and copy the new one. If you simply overwrite it, ldid will either crash or not work.
Alternatively, you can ldid on OSX in xcode:
ldid for osx is here. You can do this on osx machine or add it as a build step in xcode:
* Under targets, your project, right click and select Add, new build phase, New run script build phase.
* Type in /usr/bin/ldid -S FULLPATH_TO_YOUR_BINARY
5) Respring to show your app icon. You must respring using either my respring app or sbsettings respring function. These will rebuild the cache and your icon will show up. A simple “killall SpringBoard” will not do this.
6) Finally, make sure you leave all code signing authority out of your Info.plist. By default, this will not be present.
How to make 2 apps one for 3.0 and one for 4.0 into one package:
If you have an existing app that is 3.0 and you are updating it for 4.0 and you need two apps to exist, you should instead control this by a launch script. For this we will use Snapture as an example. Snapture 3.0 binary is named Snapture3, snapture 4.0 binary named Snapture4. Then we make a bash script as Snapture. All get 755′d and Info.plist points to Snapture. Inside snapture you have:
!#/bin/bash
Snapture=$(dirname “$0″)
SOMEFRAMEWORKONLYON3=/System/Library/Frameworks/GameKit.framework/GameKit
if [[ -f $SOMEFRAMEWORKONLYON3 ]]; then
exec “/Applications/Snapture.app/Snapture4″
else
exec “/Applications/Snapture.app/Snapture3″
fi
Now your app runs on both 3.0 and 4.0 even though it has 2 separate binaries.
How to make a single app bundle for iPad and iPhone using separate binaries:
Using the example above, we can make a small modification and you can have a single app submission that works for both iPad and iPhone/iPods. I used clockus app as an example. The binary for iphone is clockusiphone and for ipad is clockusipad. Here is your script: (gsc.wildcat.list should only exist on ipads).
#!/bin/bash
Clockus=$(dirname “$0″)
SOMEIPADONLYFILE=/var/lib/dpkg/info/gsc.wildcat.list
if [[ -f $SOMEIPADONLYFILE ]]; then
exec “${Clockus}”/clockusipad
else
exec “${Clockus}”/clockusiphone
fi
Lets say you have a mobile substrate dylib and you need 2 binaries for that. Here is how you can handle it:
Make a new dylib that has *only* this function in it. This will be loaded by mobile substrate and decide which dylib to load at runtime.
init()
{
char* dylibPath = NULL;
// Get the system version and the path to the real mobile substrate dylib
if([[UIDevice currentDevice] systemVersion] hasPrefix:@”2″])
{
dylibPath = “/Applications/myapp.app/mydylib2.dylib”;
}
else
{
dylibPath = “/Applications/myapp.app/mydylib3.dylib”;
}
void* libHandle = dlopen(dylibPath, RTLD_NOW);
if(libHandle != NULL)
{
// This assumes your dylib’s init function is called init, if not change the name in “”
void (*init)() = dlsym(libHandle, “init”);
if(init != NULL)
{
init();
}
dlclose(libHandle);
}
}
There are a couple other minor differences between a jailbroken app and an appstore app:
1) Appstore app runs in a sandbox at /var/mobile/Applications/GUID/folder. Jailbroken app runs in /Applications
2) Appstore app has a Documents folder that is created by the installation process. Jailbroken app does not. It is up to the app to create its own folder. Should you need this type of folder, you must create this with a simple mkdir command in your applicationDidFinishLaunching function. Just add a simple function: mkdir(“/var/mobile/Library/YOURAPPNAME”, 0755); If the folder already exists, no harm done. You want to do this because the install process runs as user root and the app runs as user mobile. If Cydia does this for you then the folder will have the incorrect permissions.