ECID Grabber & iBEC and iBSS Grabber

Author: Pico  //  Category: General, Jailbreak

An ECID Grabber that difrnt created.

It makes the process of getting your purplera1nyday certificate faster and less complex.

Read More / Download At: http://difrnt.com/blog/?p=25

*Getting your ECID and purplera1nyday certificate may be crucial to your 3Gs Jailbreak!

Screenshot:

UPDATE #1

difrnt also created a iBEC and iBSS Grabber!

If you find it too hard to manually grab the iBEC and iBSS files that may be needed for the 3Gs Jailbreak, try this app out.

Read More / Download At: http://difrnt.com/blog/?p=25

*Screenshot

ibec_ibss

Jailbroken iPhone Push Notification Problems and Unstable ultrasn0w Signal?

Author: Pico  //  Category: News, Uncategorized

-
If you are decided that you want to try setting up your phone as a new phone after jailbreaking but want to keep all your SMS, notes, bookmarks, calendars, and mail accounts, please read and follow BigBoss’ 3.0 Preparation Guide prior to setting up as a new phone.
-
Update 4 (6/25/09 8PM EST): My battery drainage problems seems to originate from bluetooth. I LOSE battery charge even when plugged in when bluetooth is enabled. When I shut it off, I no longer have that problem. This is a pretty big bug to have missed the beta testing, so it is either a) personal phone problem, b) jailbreaking problem, or c) SBSettings toggle bug. I’ll do more tests and update later.

Edit: I think I may have found a cause for the insane battery drainage: bluetooth A2DP. Right before I noticed the battery drainage, I tested out A2DP on my car stereo system with streaming music. I believe that before I noticed drainage the first time (2 days ago), I also tested the A2DP streaming. Another user commented that he also noticed high drainage after using A2DP.
——–
Update 3 (6/24/09 6PM EST): I was still having a plethora of problems with my jailbroken 3.0 phone on T-mobile. The battery drainage was above the roof, it would lose a percentage every minute or so – basically draining the battery within two hours. I did everything to try to diagnose the problem, and it seemed that a full restore did the trick. So many problems seem to originate from restoring your old phone backup, ESPECIALLY if it was jailbroken before. If you are having any troubles, whether poor battery life, unstable connection, etc; I suggest doing a full restore and setting it up as a new phone.

Another problem some users faced is the unstable T-mobile signal with ultrasn0w, which seemed to originate from MMS settings in conjunction with a backup restore.

So here is what I’ve learned over the past few days about 3.0, jailbreaking, and unlocking:

  • Push is broken if you hacktivated your phone (2G or 3G)
  • To get push working on your iPhone 3G, you must activate with any AT&T Sim
  • No known push fix for the iPhone 2G
  • Some users are reporting that you cannot have Push and MMS setup at the same time using ultrasn0w. Either Push stops working or your signal becomes unstable once you enter the MMS settings in.
  • In many cases, restoring your old iTunes iPhone backup will cause problems – especially if the backup was made from jailbroken phones
  • Old 2.x backups seem to cause some or all of the following: Poor battery life, unstable ultrasn0w connection, and unable to launch apps
  • If you have ANY problems after upgrading: restore and setup as a new phone, this will fix 90% of the problems
  • Apple is a bitch

——–
Update 2 (6/24/09): If you have an AT&T sim lying around (activated or not), you can try this method to get push working on iPhone 3G’s (from user “l1ceo1l” on macrumor’s forums):

Tip: if you SSH to /var/root/Library/Lockdown/activation_records and delete wildcard_record.plist, the next time you reboot your phone, it will ask for activation again, thus allowing you to easily put in an AT&T sim and activate with iTunes open – this should allow you to skip the restore and re-jailbreaking steps if you already are in that state.

  • You need a Unactivated or Activated ATT Sim
  • Take out your T-Mobile SIM and Pop in your Unactivated ATT Sim card (Just found out any ATT Sim is ok).
  • Restore and Jailbreak with redsn0w
  • (If you deleted wildcard_record.plist, you can skip this step)

  • Go to settings and turn off your 3G!
  • Let iTunes activate the phone – you should get a “Waiting for activation.” message, dismiss it and Open cydia.
  • Add the Ultrasn0w source repo666.ultrasn0w.com
  • Install Ultrasn0w and turn off your phone
  • Remove the unactivated ATT sim and insert your T-Mobile sim
  • Turn on the phone, once you receive service you should get the message. “iPhone has been activated”

———
Update 1 (6/23/09): It seems that I did something else on top of replacing my lockdownd. Users on howardforums found out that to get push working with jailbroken phones, you MUST activate it with an active AT&T sim (sim that currently has service). I asked my friend with a legit AT&T service to send over his lockdownd and replaced mine – and it worked.

A few results have come back from both 2G and 3G users and apparently the lockdownd method does not work – after rebooting it has them activate again. Currently, the only sure way to enable push and stable ultrasn0w is to activate your phone (before redsn0w or after pwnage) with a legit, working AT&T sim.

It might have been a fluke on my part, but I apologize for suggesting a method that does not work. I will keep looking into this. The Dev Team does recognize this problem and are currently working on the push problem.

I will keep the original post intact, as it has good information to those who don’t know whats going on.

——————–
ORIGINAL POST

This is a notice to everyone that hacktivated your phone (either had pwnage tool activate for you or did NOT activate the phone with an active Sim before running redsn0w), your push notifications will not work – This is a known bug. You can easily test push by downloading the Free AIM app from the appstore and messaging yourself from a computer – it should work on wifi and edge\3g.

Also, if you used an inactive ATT sim (no current service) to activate your iPhone and attempted to use ultrasn0w afterwards, you might have had signal dropping problems (have full bars + data, then randomly drop signal + data every 20 seconds).

The only current solution is to activate your phone with a legit, ACTIVE AT&T sim (or whatever carrier your iphone is originally locked to). Push (and youtube) will work and you will not drop signal.

Activation remained the same since 1.x to 2.x, and you can just replace the lockdownd file located in /usr/libexec/ and chmod it 755

lockdownd is the main (and only) activation file:
http://theiphonewiki.com/wiki/index.php?title=Lockdownd

Here is a working, 3.0 active-ATT lockdownd (3G iPhones ONLY):
REMOVED

SSH into your phone (doesn’t matter if it was hacktivated or activated with a deactivated sim) and browse to /usr/libexec/.

Rename your current lockdownd file to lockdownd.old

Upload the new lockdownd and chmod it to 755

Reboot your phone

This *should* fix all your push or signal problems. This lockdownd is from ATT US, so it may not work with other carrier locked phones. The current lockdownd is from an iPhone 3G, so it will not work on 2G iPhones until someone sends me a lockdownd from an active-ATT activated iphone 2G. Install SBSettings so if it does not work or your phone has an endless reboot, you can SSH back in and restore your lockdownd. (sbsettings turns on openSSH after a reboot).

I have only tested this myself on an iPhone 3G and T-Mobile Sim, so please let me know if this works for you. Please note that this should only be a temporary solution until the Dev Team fixes their activation methods with jailbreaks. If push already works for your jailbroken phone and having no problems with ultrasn0w, do not bother replacing lockdownd.

RedSn0w Guide

Author: BigBoss  //  Category:

Guide updated May 6, 2011 supporting up to firmware 4.3.3.

This guide applies to all versions of Redsn0w. The pictures show v0.7 but this hasn’t changed. The guide has been updated for all firmwares.

Downloads:

Redsn0w is specific to your firmware. The latest version does not jailbreak all firmware versions. Please download the tool version below based on your firmware or your operating system (MAC vs Windows).

Redsn0w v0.8 (firmware 3.0 & 3.0.1) MAC Windows
Redsn0w v0.9.4 (3.1.2, 3.1.3) MAC Windows
Redsn0w v0.9.5b5-3 (4.0 only iPhone 3g) MAC Windows
Redsn0w v0.9.6b1 (4.1 only iPhone 3g) MAC Windows
v0.9.6.b4 (4.2.1, all devices) MAC & Windows
v0.9.6.rc9 (4.3.1) MAC & Windows
v0.9.6.rc14 (4.3.2) MAC & Windows
New–> v0.9.6.rc16 (4.3.3) MAC Windows

Firmware 3.1 users, you must update or use another tool like pwnage.

For iPhone 2g unlock (skip if you do not need to unlock): Bootloader 3.9 and 4.6.
Appropriate firmware file. You can get all firmwares from my firmwares link.

(Note screenshots are from a PC, but they are the same as MAC)

Guide:
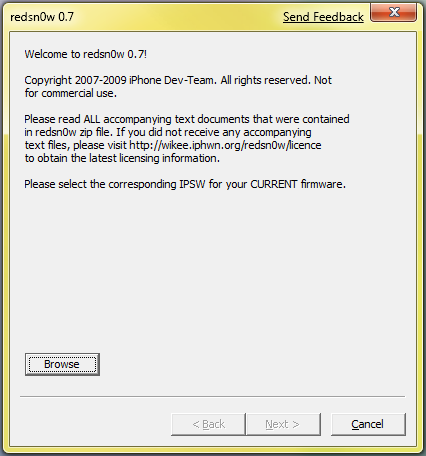
Step 1) Run redsn0w (Windows 7 users, run this in XP compatibility mode to avoid hanging on uploading firmware bundle step).

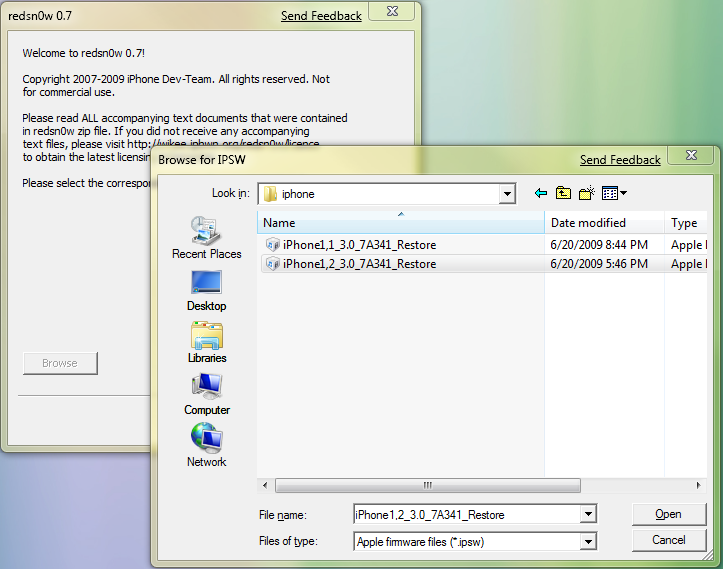
Step 2) Press “Browse” and find the correct firmware for your device.  You should have downloaded it above because you should have read the needed files section!  PLEASE make sure that if you have an iPhone 3G, your firmware should start with iPhone1,2, iphone 3gs firmware starts with iPhone2,_1 and if you have an iPhone 2G it should start with iPhone1,1!  This is a big deal, it won’t work without the correct firmware!

Note one more thing. If you are jailbreaking firmware 3.1.3, feed redsn0w firmware 3.1.2. You can download the 3.1.2 firmware file from the firmwares section of this site. (Yes, that’s right. You restored with 3.1.3 but are using 3.1.2 firmware to jailbreak). For all other firmware versions, you should use the firmware that you used to restore.

Click “Open”, and redsn0w will process your firmware.  When it is done, it should say “IPSW successfully identified”.

Step 3) On the next screen you will be able to install Cydia, and I suggest you do so.  What’s the point of jailbreaking if you can’t install jailbroken apps? (rhetorical =) Note: DO NOT INSTALL ICY. At least at the point of this writing, there seem to be conflicts having both installed and Cydia handles apps better and you will have less problems.

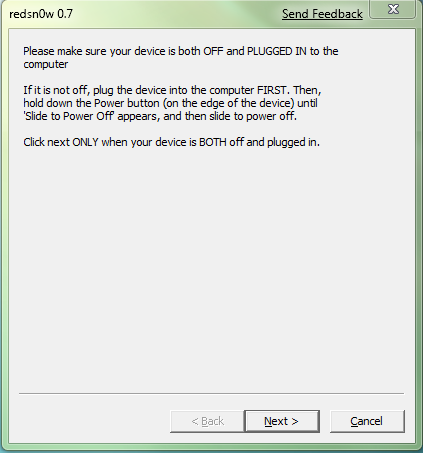
Just hit the next button, and you will see this:

At this point, you want to turn your phone off.  Hold the power button until you see the “slide to power off”, and do it!

The next screen wants you to follow a series of instructions that will put your phone in DFU Mode.  This will allow redsn0w to perform the jailbreak.  You need to do this correctly otherwise it won’t work. If you have any problems, see my DFU mode guide.

  1. Hold down the Power (corner) button for 3 seconds
  2. Without releasing the Power button, push the Home (bottom center) button for 10 seconds
  3. Without releasing the Home button, release the Power button BUT KEEP holding the Home button for 30 seconds.

Once redsn0w starts doing something, you can release the home button on the third step, you don’t have to hold it down for all 30.  You’ll KNOW when it happens.

Now your phone will be doing a series of things – and in the end, you will have a jailbroken iPhone!  Please comment below with success, failure, and suggestions on the short guide.

Click HERE for current jailbreak status

EasyWakeup v2.5 Update

Author: freeterra  //  Category: Apps, Jailbreak

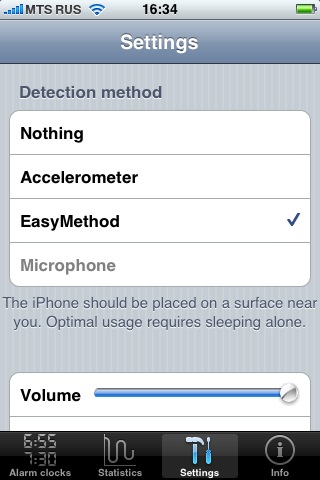
In this version we added new detection method – EasyMethod.

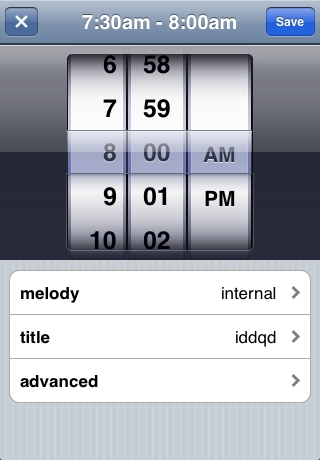
It’s ability to detect the most opportune time for awaking WITHOUT ATTACHING your device! In the past you had to attach the iPhone to your wrist. Now you don’t have to.
This method uses more sensitive accelerometer settings to detect your night movements via mattress vibration. Just place your iPhone/iPod Touch on a surface (mattress) near you. And set your alarm window.

Also we updated user interface part of application.
And many other minor improvements.

For more information please visit our site: EasyWakeup.net

iTypeFastR – an Improved iPhone Keyboard

Author: iTypeFastR  //  Category: Apps, Jailbreak


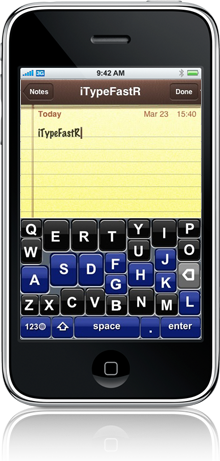
iTypeFastR is a revolutionary iPhone keyboard app that makes you type faster with less typos. iPhone’s keyboard is slightly too small to type fast. iTypeFastR fixes that.

The iTypeFastR keyboard works because of the adapted QWERTY design in which the letters most used in the English language are made much larger.

And by using every pixel possible, iTypeFastR didn’t have to make the less used keys smaller. Based on one million messages in twitter, iTypeFastR counted the frequency of used keys to determine the design of the numeric keyboard.

The keyboard works in other applications, you can use your favorite notes application, mail program or browser, and use the keyboard from there.

iTypeFastR is – for now – only available for jailbroken iPhones. Users can try it for free for 20 days, and then buy the app for only USD 3,99.

After two days, we have more than 10,000 installs already. Some early user responses: “This makes me switch back from Android to iPhone as my primary device”, “This is extremely interesting and clever.”

Download the app on Cydia , in the category ‘Keyboards’ and read more about iTypefastR on:
http://www.itypefastr.com

pHaseBanDowngrader – Downgrade your 3g baseband

Author: pH  //  Category: Apps, Jailbreak

-

Hey Guys, here is pH (Pedro Henrique Franceschi). Today, I developed a tool to Downgrade your iPhone Baseband from 02.30.03 to 02.28.00 based on GeoHot’s method. The tool is called pHaseBanDowngrader and works great. You may need to downgrade your baseband to use Yellow Sn0w to unlock. As you may know, YellowSn0w only works on 2.28 baseband. Previously, those of you that upgraded to 2.2.1 could not use YellowSn0w. Now you can.

Read more…

Compile For Cydia Submission

Author: BigBoss  //  Category:

Updated September 23, 2011:

In order to submit your app to Cydia, you will need to do a few things:

Sign your app with ldid, build for iPhone OS, test your app in jailbreak world.

Dont have a MAC?

Before you read on, there is a very easy framework for building applications in iPhone OS without xCode created by genius Dustin Howett. With this framework, you can compile on your iPhone, iPod, iPad without the need for owning a MAC.
See this link for more details. If you want quick and easy install instructions for installing theos on your idevice to use via ssh, do this:

1) Fire up cydia, make sure you’re set as user type developer, and search “BigBoss Recommended”. This is a set of command line tools that also has a hidden installs script.
2) In ssh on idevice, type “installtheos3″. This will download over 100mb of data so make sure you have a stable Wi-Fi connection.
3) This will install theos to /var/theos.
4) For further theos help, I recommend irc channel irc.saurik.com #theos or refer to the link above for more details.

If you want to compile for Cydia using xCode, read on.

Compiling on the MAC with xCode

Code signing from xcode will not work. You will need to sign your app with ldid. Here are the steps to test your app in jailbreak world, sign it, and make its icon show up on your iPhone:

1) Build your binary in xcode with iPhone OS 3.0 setting or build your app using iPhone GCC or toolchain. Xcode always defaults to building only for the latest firmware. This seems like Apple’s way to force everyone to always update. It’s silly. Unless you have a technical reason for it, build for iPhone OS 3.0 not 3.1, 3.1.3 etc. If your app requires a specific version of the OS, you must state this clearly in the submission form or your submission will be delayed while I ask you to rebuild your app.

For code signing, you can just use “don’t code sign” in the “info” section of your project. Search for “code signing” to find where to set this. You will use ldid in a step further down instead. Note: this option seems to only exist for the 2.0 SDK or 2.0 SDK build option.

For SDK 3.0, disabling code sign is a bit trickier. It requires editing your /Developer/Platforms/iPhoneOS.platform/Developer/SDKs/iPhoneOS3.0.sdk/SDKSettings.plist and making it look like this:
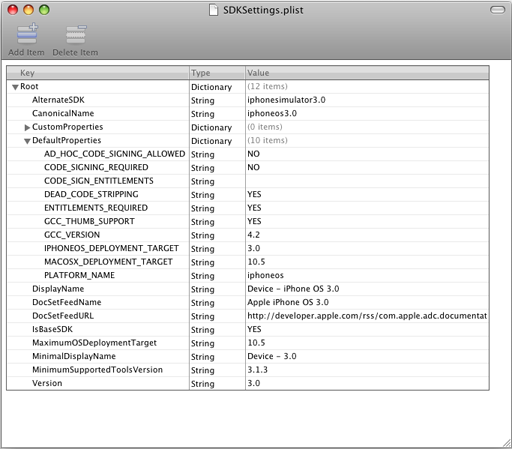
Pay special notice to CODE_SIGNING_REQURIED, CODE_SIGN_ENTITLEMENTS, and AD_HOC_CODE_SIGNING_ALLOWED. You must restart xcode to have changes take effect.

2) SSH your application bundle to /Applications folder on iPhone.

3) chmod 755 your app binary inside your app bundle. If your app name is Test.app and your binary is test, then you would use: chmod 755 /Applications/Test.app/test

4) ldid sign your binary. Using the test example: ldid -S /Applications/Test.app/test. You should run this as user root, not user mobile. If you don’t have ldid installed on your iPhone, ssh in as user root, apt-get install ldid, then you will have it. Note: if you are working in mobile terminal, make sure to su root first. Note #2: ldid requires a unique inode. If you are replacing your binary with another compiled version, you must delete the old one and copy the new one. If you simply overwrite it, ldid will either crash or not work.

Alternatively, you can ldid on OSX in xcode:

ldid for osx is here. You can do this on osx machine or add it as a build step in xcode:
* Under targets, your project, right click and select  Add, new build phase, New run script build phase.
* Type in /usr/bin/ldid -S FULLPATH_TO_YOUR_BINARY

5) Respring to show your app icon. You must respring using either my respring app or sbsettings respring function. These will rebuild the cache and your icon will show up. A simple “killall SpringBoard” will not do this.

6) Finally, make sure you leave all code signing authority out of your Info.plist. By default, this will not be present.

How to make 2 apps one for 3.0 and one for 4.0 into one package:

If you have an existing app that is 3.0 and you are updating it for 4.0 and you need two apps to exist, you should instead control this by a launch script. For this we will use Snapture as an example. Snapture 3.0 binary is named Snapture3, snapture 4.0 binary named Snapture4. Then we make a bash script as Snapture. All get 755′d and Info.plist points to Snapture. Inside snapture you have:

!#/bin/bash
Snapture=$(dirname “$0″)
SOMEFRAMEWORKONLYON3=/System/Library/Frameworks/GameKit.framework/GameKit
if [[ -f $SOMEFRAMEWORKONLYON3 ]]; then
exec “/Applications/Snapture.app/Snapture4″
else
exec “/Applications/Snapture.app/Snapture3″
fi

Now your app runs on both 3.0 and 4.0 even though it has 2 separate binaries.

How to make a single app bundle for iPad and iPhone using separate binaries:

Using the example above, we can make a small modification and you can have a single app submission that works for both iPad and iPhone/iPods. I used clockus app as an example. The binary for iphone is clockusiphone and for ipad is clockusipad. Here is your script: (gsc.wildcat.list should only exist on ipads).

#!/bin/bash
Clockus=$(dirname “$0″)
SOMEIPADONLYFILE=/var/lib/dpkg/info/gsc.wildcat.list
if [[ -f $SOMEIPADONLYFILE ]]; then
exec “${Clockus}”/clockusipad
else
exec “${Clockus}”/clockusiphone
fi

Lets say you have a mobile substrate dylib and you need 2 binaries for that. Here is how you can handle it:

Make a new dylib that has *only* this function in it. This will be loaded by mobile substrate and decide which dylib to load at runtime.

init()
{
char* dylibPath = NULL;

// Get the system version and the path to the real mobile substrate dylib
if([[UIDevice currentDevice] systemVersion] hasPrefix:@”2″])
{
dylibPath = “/Applications/myapp.app/mydylib2.dylib”;
}
else
{
dylibPath = “/Applications/myapp.app/mydylib3.dylib”;
}

void* libHandle = dlopen(dylibPath, RTLD_NOW);
if(libHandle != NULL)
{
// This assumes your dylib’s init function is called init, if not change the name in “”
void (*init)() = dlsym(libHandle, “init”);
if(init != NULL)
{
init();
}
dlclose(libHandle);
}
}

There are a couple other minor differences between a jailbroken app and an appstore app:

1) Appstore app runs in a sandbox at /var/mobile/Applications/GUID/folder. Jailbroken app runs in /Applications

2) Appstore app has a Documents folder that is created by the installation process. Jailbroken app does not. It is up to the app to create its own folder. Should you need this type of folder, you must create this with a simple mkdir command in your applicationDidFinishLaunching function. Just add a simple function: mkdir(“/var/mobile/Library/YOURAPPNAME”, 0755); If the folder already exists, no harm done. You want to do this because the install process runs as user root and the app runs as user mobile. If Cydia does this for you then the folder will have the incorrect permissions.

ToneFXs v1.5 Update

Author: theafricannerd  //  Category: Apps, Jailbreak, News
We have updated ToneFXs to version 1.5. It is a free update for currently registered users. Not much has changed on the surface. It is under the hood where a lot of work has been done.  We had to make some major changes behind the scenes to serve as the foundation for version 2.0. These changes we have made give us the power to do some really amazing things with sound customization on the iPhone. That being said, there are a few cool things in this new version.  ToneFXs is now WinterBoard compatible. Even cooler is that it lets you use any of the WinterBoard sound themes you have downloaded and apply them to any of the sounds of the major apps. We have also streamlined Ringtone Shuffling, maker it even easier and faster. ToneFXs is available in Cydia. For more info, please visit http://www.tonefxs.com

xGPS, iPhone’s first turn-by-turn GPS App

Author: Pico  //  Category: Apps, Jailbreak

BigBoss Edit: Excellent post Ranova. Added as rule #16 to why jailbreak.

Here’s another reason to jailbreak your iPhone 3G. Today, xWaves released the highly anticipated update to their GPS app for the iPhone: xGPS. xGPS features full turn-by-turn guidance through the clever use of Google Maps. It also features full voice directions (TTS – text-to-speech) that try to pronounce the upcoming turn in full detail (direction, street name, etc), a feature a lot of standalone GPS’s do not have. It does a pretty good job at pronouncing street names. A female voice (found in most GPS units) would sound a lot better than a robotic voice, but it is still decent.

Watch the demo of xGPS 1.2 in action.

My initial impressions of xGPS fare pretty well. On 30 mile commute back from work, I gave xGPS a whirl. I had set up my “Home Address” pre-emptively, so I click the little magnifying glass and a few options pop up:

Main Menu

From there, I simply chose “Go Home,” and it calculated the route and off I went. On the way back, I decided to go off-route to avoid toll roads, which Google Maps seems to love since it is the “easiest” way. After a few seconds of “WrongWay” flashing on the screen, it recomputed the itinerary. At first, it kept telling me to do a U-turn to get back on course of the original route. But after a few tries, it finally gave up and gave me a whole new route to go home. It finally got me home, and without weird off-roads that my standalone GPS likes to give when I choose not to go on toll roads. I pre-downloaded the area of the routes just in case I lost cell signal and it could not download the map area – and it seemed pretty smooth while I was driving.

Being the first working turn-by-turn version (1.1 was more of a demo that it could be done), xGPS 1.2 did better than I expected. It is fully functionaly and can be used in place of a standalone, but without all the special features a standalone has.

One notable problem is the volume of the TTS, it seems incredibly low. I had to connect my iPhone to my car sound system before I could hear it against all the snowplows and cars passing by. Playing music in the background (using the iPhone music player) makes the TTS voice also very hard to hear.

Another special feature is the maps downloading. You can download maps on your iPhone xGPS software or with software on your computer (Website). If you download the maps on your computer, you can setup a quick wireless transfer and transfer the downloaded Google maps straight to your iPhone. Quick tip: When you select the area of a map you want to download, you must select zoom levels. I find zoom levels 1 and 2 to be enough. So when it asks you for the title and zoom levels, you would enter in: 1,2. Zoom levels range from 0 (closest) to 17 (furthest). If you wanted the full range, you would enter in 0,1,2,3…17. Be warned, this will hugely increase the size of the maps. Entering in 0,2 resulted in a 650mb map for me, while 1,2 resulted in a 250mb map. The more detailed (lower numbered) maps are much, much larger.

xGPS Manager Main Window

Here is a breakdown of the Pro’s and current Con’s of xGPS 1.2:

Pros

  • Uses Google Maps routing and maps.
  • Works well as a standard turn-by-turn GPS device
  • Includes TTS to speak out road names and highways
  • Recomputes Itinerary when going off-course
  • Clean and simple interface
  • Can be laid out vertically or horizontally
  • Night-mode to dim the maps during certain hours.
  • Maps rotate in-relation to what direction your car is facing, making it easier to navigate.
  • Ability to pre-download maps from the iPhone or your computer and transfer it wirelessly between the two.
  • Maps will be as current as Google’s maps

Cons

  • Only uses the routes given by Google Maps – and these routes may not be the most cost effective or most time saving route.
  • Recomputing routes can be iffy at times
  • The need for a data connection to compute routes
  • POI “locations” search works, but there is no way to get directions to the POI yet
  • No large arrow showing what to do next, a common feature that most GPS units have
  • No “time left” estimation and estimated “time on arrival”
  • When playing music from the iPhone, you can barely hear the voice guidance system.
  • Bookmark system is pretty barebones and messy – it needs to allow to save a single destination and not require a starting point and a destination.

What it Needs to be a full-time replacement

  • Multiple route selections – this may be a limitation of google maps, but allowing you to select certain options for routing is standard in a lot of GPS units. For example: to allow or disallow Toll roads, road conditions, and traffic.
  • Large Arrow showing your next turn (and even the turn after that)
  • Time-left estimation
  • Estimated Time of arrival
  • Traffic reports from Google Maps
  • Working POI system, allowing you to get details of the POI (Phone number, website, etc) and directions there from current location
  • Lowering music volume whenever it has a voice prompt

Final Words

This is a huge step in turn-by-turn app development. This will lay all your concerns about whether or not the iPhone 3G’s GPS can do turn-by-turn to rest. It does it and it does it well. While this may not fully replace your standalone GPS unit, it can be definitely used as a standalone if you currently do not own one. If you have a jailbroken iPhone 3G, give it a try and donate to the developers! xGPS is currently free and the developers have stated they want it to remain free. I cannot wait for what they have in store for us in future versions.

Lastly, you iPhone 2G users are not out of luck. You can purchase a seperate GPS module that attaches to the iPhone 2G/iPod Touch that will allow this turn-by-turn app to work. No details on this or how much the module will cost.

So what are you waiting for? Go in cydia and download it now! Please Digg this submission to help spread the word of xGPS!

xWaves Development Team Blog

Screen of xGPS

CallerID Spoofing Now Free With iSpoof!

Author: iSpoof  //  Category: Apps, News

It pleases me to announce that iSpoof 2.0 now lets you make unlimited FREE calls!  You don’t even need to sign up for an account or fill out any forms.  What’s the catch?  When making free calls, iSpoof will play a short nine-second advertisement before your call is connected.  iSpoof currently supports free calls to the US/Canada, certain parts of Europe and many other international destinations.  We also have access numbers in 40+ countries so a person from France could call someone in Hawaii for free using iSpoof (if so inclined.)

We wish we could offer free spoofing without ads, but they help cover the costs we incur on our end.  If you like iSpoof and want to take full advantage of its features, you can sign up for an account inside the app.  It’s an amazing tool, so be sure to click here and try it out!

What is iSpoof?

iSpoof is a revolutionary iPhone/iPod App that gives you COMPLETE control over your phone calls, empowering you to change Caller ID, disguise your voice, record your calls, and more! All this is combined with seamless iPhone integration.

Here are a few of the major features that you will not find anywhere else or all in one place:

  • International Caller ID Spoofing
  • Go straight to someone’s Voicemail. Don’t feel like talking to some people? Just leave em’ a message! Their phone never rings, but still shows a missed call from your spoofed Caller ID!
  • Record your calls and replay them straight from your phone. iSpoof also integrates with you Address Book
  • Local access numbers in 40+ countries
  • Spoof DIRECTLY from the app! No call-back needed!
  • Support for iPod Touch, just enter your cell phone number in settings, place a call, and you will receive a ‘call-back’ to your phone. Once you answer, your iSpoof call will be connected!
  • Simple, easy-to-use interface with iPhone look and feel
  • Best real-time Voice Changer

With so many amazing features combined in one easy to use package, just imagine what you can do; the possibilities are endless. So be sure download/use iSpoof for free and enjoy! After all, it’s your call—CONTROL IT!

Official iSpoof Website and FAQ

EasyWakeup 2.01. Night graphs are available now!

Author: freeterra  //  Category: Apps

We are glad to inform you that we released v2.01 of EasyWakeup. Now it’s multilingual! Russian, German, Spanish, Dutch are available now.

We improved main program algorithm. v2.01 finds the opportune moment to awaken you more accurately.

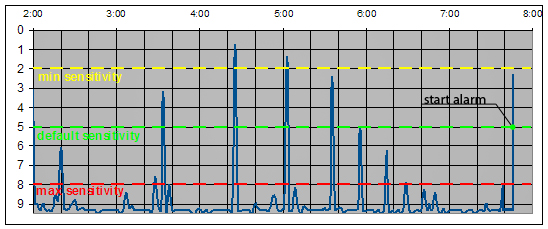
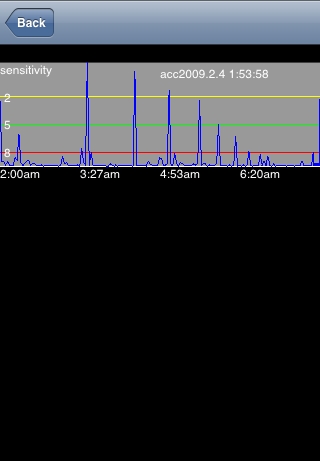
Also now you can see your night sleep graphs. And you can find optimal sensitivity for your body.

Important update: Put word “stat” in title of your alarm clock for activate night sleep statistics.

New Application: iSpoof

Author: iSpoof  //  Category: Apps

Hello fellow Jail Breakers! After staying up countless nights writing code (and drinking way too much Red Bull,) I would like to introduce my latest application. I have called it… drum roll… iSpoof!

This is the app the phone companies don’t want you to have. iSpoof gives you COMPLETE control over your phone calls, empowering you to spoof ANY Caller ID, disguise your voice, record your calls, and more! All this is combined with seamless iPhone integration.  No other spoofing applications available are even in the same league.

Here are a few of the major features that you will not find anywhere else or all in one place:

  • Go straight to someone’s Voicemail. Don’t feel like talking to some people? Just leave em’ a message! Their phone never rings, but still shows a missed call from your spoofed Caller ID!
  • Record your calls and replay them straight from your phone. iSpoof also integrates with you Address Book
  • Spoof internationally
  • Spoof DIRECTLY from the app! No call-back needed!
  • Support for iPod Touch, just enter your cell phone number in settings, place a call, and you will receive a ‘call-back’ to your phone. Once you answer, your iSpoof call will be connected!
  • Simple, easy-to-use interface with iPhone look and feel
  • Best real-time Voice Changer

With so many amazing features combined in one easy to use package, just imagine what you can do; the possibilities are endless.  So be sure download my app for free or install it through Cydia and enjoy!  After all, it’s your call—CONTROL IT!

SBSettings Processes Widget

Author: BigBoss  //  Category: Apps

Update v1.1b: Added app icons for apps that are running. See updated screenshots below.

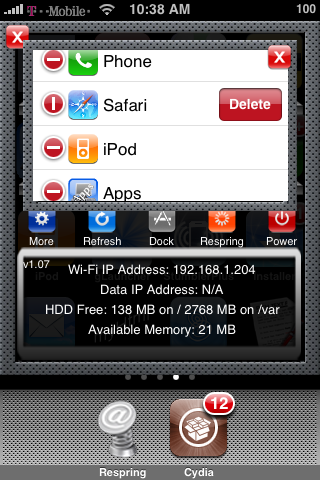
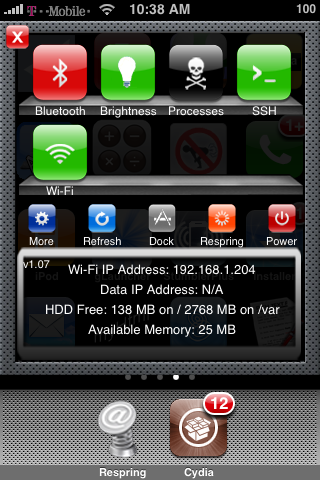
Today I released v1.0b of the Processes Widget for SBSettings. This is a task killer widget that displays tasks and lets you kill them (from within any app).

To use, just bring up SBSettings, select “Processes”, then delete the task you want to kill. If you have SBSettings 1.07 or newer, you can see the available memory is freed up within a second or two.

To make this more usable for the masses, this is not like a full “top” app. Only tasks you launched from springboard and may want to kill are included. Apps like top show every process on the system. But you most likely do not know what any of those are nor should you be killing any of them. Instead, this takes the approach to be a bit more friendly and only show you the apps you care about. The ones you know of and are should be able to close. The tasks displayed are ones that stay backgrounded when you press home and / or tasks that were backgrounded with the backgrounder app.

Note: some tasks, the iPhone will start right back up if you kill such as phone or mail.

In addition, I released SBSettings v1.0.7 today which adds a total available memory line on the text display. This replaces the iphone name which was not so useful.

Note that deleting safari task frees up 4 mb of RAM in the screenshots below:

iRealSMS v2.0.6 Adds QuickReply

Author: BigBoss  //  Category: Apps

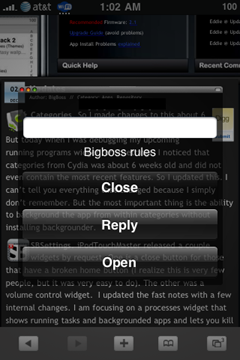
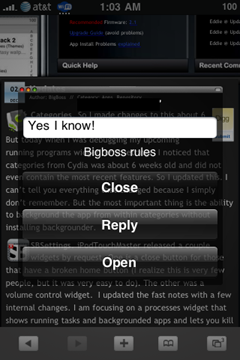
iRealSMS v2.0.6 just added a bitchin new feature.  QuickReply! You can now receive an SMS while in an app or game or such and you can reply to it without quitting your game or app.  Check it out:

Here I am browsing the greatest web page in the world when I get an SMS like I normally get all day:

Then I reply (with what anyone would say to this):

And I see the airplane symbol for a second in my statusbar while the text is being sent:

And that’s it! Back to safari without missing a step. No more having to decide whether or not you will reply now or when you’re done with what you’re doing.

I think this is fantastic and have updated the reasons to jailbreak page with this news.

SBSettings v1.0.4 and New Toggle Widget

Author: BigBoss  //  Category: Apps, Uncategorized

Update v1.0.6 (Nov 30, 2008): Made a couple small changes to the “more” app to hopefully address those that find it crashing as soon as it loads. Please try it out and let us know. If it crashes once, run it again. It attempts to do something different if it detects that it crashed the previous run.

Update: v1.0.5 – I gave up trying to fix a problem I cannot reproduce and decided to work to avoid it. I added a “blank fix” button to the dock icons screen and removed the automatic blank fix that caused the problems.

So many of you are still reporting crashing on the “more” app when you try to modify your dock icons. We still cannot reproduce this issue. I have emailed out a few copies of a test version of SBSettings to some users but never heard back. So I decided to release it. The new version made some changes in the dock icons enumeration code, but I cannot be sure that it solved the problem because I cannot see the problem occur in the first place. Please update and let me know. Update: this did not solve the problem. I cannot reproduce this and therefore will never be able to fix it unless someone that is very good in SSH that can reproduce the problem wants to email me and help out. This means you would be available to spend some time running development builds over and over again and giving me back logfiles. If you are interested in this and can reproduce this problem let me know. Otherwise, at least it works for me :)

New Toggle Addon
While messing around, I decided to write a new widget for SBSettings. This is not a toggle but another type of addon which I think shows the flexibility and power of this app. Note that this addition was done without modification to the main app.

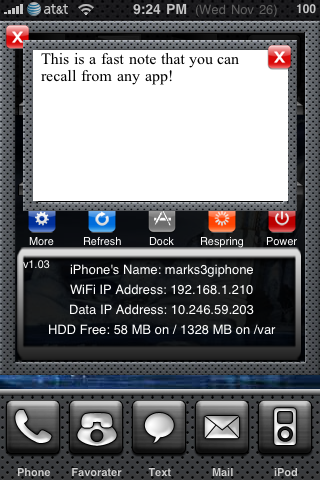
The addition is a text widget – a quick notepad. You can type some text in it, and recall it later. But since it runs inside SBSettings, you can recall it from within another app. To see how this may be useful consider this. Suppose you get an SMS that’s a password for a website. You cant remember it very easily so you want to write it down. Ok you pull up SBSettings while the SMS app is open and type the password into the text box. Later you open Safari and go to the web page that requires hte password. Now you can just pull up SBSettings while Safari is open, read the password, and type it in. (Sorry, no copy and paste but I think it’s still pretty neat).

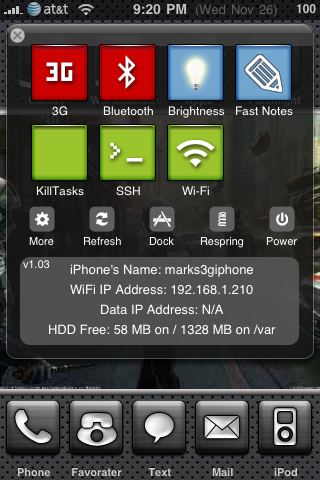
Here are some screenshots: